Are you looking to unleash your creativity with a fun and versatile art form? Look no further than paper mache! Perfect for beginners, paper mache allows you to mold and shape everyday materials into stunning works of art. In this article, we’ll explore the basics of paper mache techniques, from creating the perfect paste to forming and finishing your masterpieces. Get ready to dive into the world of paper mache and let your imagination soar!
What techniques are used for paper mache?
When creating paper mache, there are two main techniques to choose from. The first method involves using strips of paper that are glued together with adhesive to form the desired shape. Alternatively, the second method involves creating paper pulp by soaking or boiling paper, then adding glue to create a moldable material. Both techniques offer unique ways to sculpt and mold paper mache into various shapes and forms, allowing for endless creative possibilities.
How can paper mache be made for beginners?
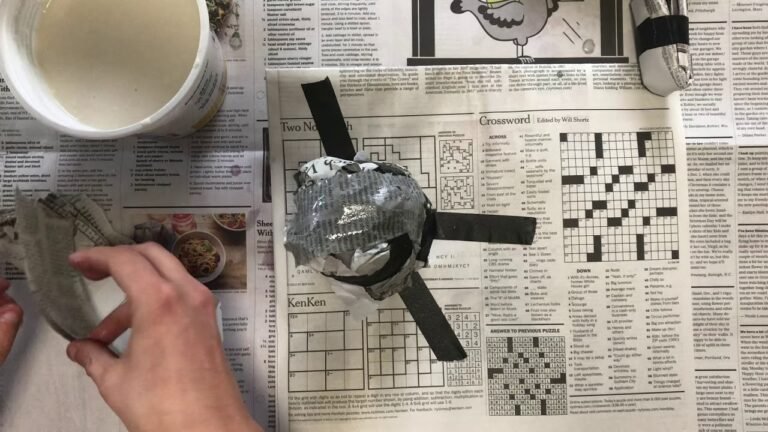
For beginners looking to make paper mache, start by mixing flour and water to create a paste. Use this paste to cover strips of newspaper, ensuring the object is covered at least three times. This simple method is perfect for those new to the craft, allowing for endless possibilities in creating unique papier mâché creations.
Which is better for paper mache: glue or flour?
When it comes to making paper mache, the choice between using glue or flour as the adhesive is a matter of personal preference and the desired outcome. Glue, such as white school glue or Mod Podge, creates a strong and durable paper mache that dries clear and is less likely to attract insects or mold. On the other hand, flour is a more budget-friendly option that is non-toxic and easy to clean up, making it a great choice for kids’ crafts. Ultimately, both options can produce great results, so it’s best to experiment with both to see which one works best for your project.
In conclusion, whether to use glue or flour for paper mache depends on the specific needs of your project. While glue offers strength and clarity, flour provides a cost-effective and safe alternative. Both options have their own advantages and drawbacks, so it’s important to consider the desired outcome and the intended use of the paper mache when making a decision. Ultimately, the best choice is the one that suits your needs and preferences.
Simple Steps to Mastering Paper Mache
Discover the art of paper mache with these simple steps to mastering the craft. Begin by gathering your materials, including newspaper strips, flour, water, and a balloon or mold to shape your creation. Mix the flour and water to create a paste, then dip the newspaper strips into the paste and layer them onto the balloon or mold. Allow each layer to dry before adding another, and get creative with your design by adding paint or decorations once your paper mache sculpture is complete.
With practice and patience, you can become a paper mache master in no time. Experiment with different techniques and shapes to develop your skills and create unique pieces of art. Whether you’re a beginner or an experienced crafter, these simple steps will guide you through the process of mastering paper mache and unlocking your creativity. So grab your materials and get started on your next paper mache project today!
Beginner-Friendly Paper Mache Tips
If you’re new to the world of paper mache, don’t worry – it’s easier than you think! One of the most important beginner-friendly tips is to start small. Choose simple shapes and projects to get the hang of the technique before moving on to more intricate designs. Another helpful tip is to use the right materials. Make sure to use high-quality paper and a good adhesive, such as a mixture of white glue and water, for the best results. Lastly, don’t be afraid to get creative! Experiment with different textures and colors to make your paper mache creations truly stand out.
When it comes to beginner-friendly paper mache tips, patience is key. Take your time when layering the paper and allowing it to dry between each layer. Rushing the process can lead to a lumpy or uneven finish. Additionally, don’t be afraid to get your hands dirty! Embrace the hands-on nature of paper mache and enjoy the tactile experience of molding and shaping your creations. Lastly, be sure to seal your finished piece with a clear sealant to protect it from moisture and ensure its longevity.
Remember, practice makes perfect! Don’t be discouraged if your first few attempts at paper mache don’t turn out exactly as you had hoped. Keep practicing and experimenting with different techniques and soon you’ll be creating stunning paper mache masterpieces. And most importantly, have fun with it! Paper mache is a versatile and enjoyable art form, so let your creativity run wild and see where it takes you.
Incorporating paper mache techniques into your creative projects can open up a world of possibilities for beginners. From creating unique sculptures to personalized home decor, the versatility and accessibility of this art form make it an ideal choice for those looking to explore their artistic side. With practice and experimentation, you can master the basics and unleash your imagination to bring your ideas to life. So grab some newspaper, flour, and water, and start molding your visions into reality with the endless potential of paper mache.


