


Looking to add a personal touch to your reading experience? Learn how to create your own paper bookmarks with our easy step-by-step instructions. This fun and creative craft project is perfect for book lovers of all ages. Follow along and in no time, you’ll have a collection of unique and stylish bookmarks to use in all your favorite reads. Let’s get crafting!
- Gather materials: Start by collecting a piece of paper, scissors, and any decorative items you want to use for your bookmark.
- Fold and cut: Fold the paper in half lengthwise, then cut along the fold to create two equal strips. Fold one of the strips into a rectangle shape and decorate as desired.
What is the process for creating a bookmark using paper strips?
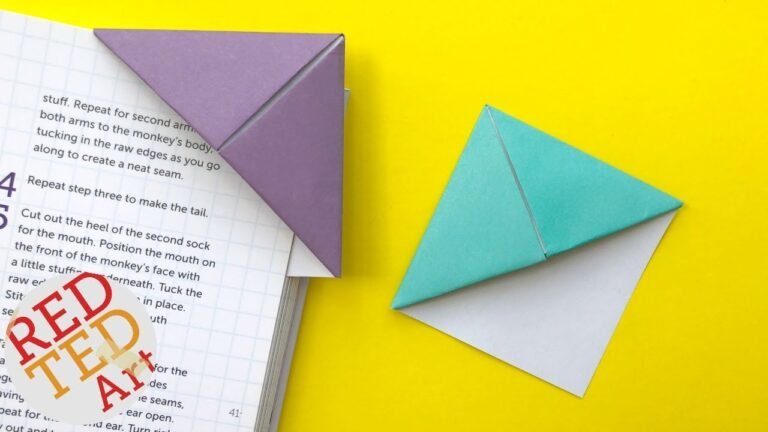
Create a unique and stylish bookmark by folding and gluing paper strips together. Start by folding and gluing the outer strips over the inner strips one at a time, adding a dot of glue to secure each fold. Then, fold the strip at a 45-degree angle to overlap the strip next to it, creating a visually appealing design that will keep your place in your favorite book.
How can a tissue paper bookmark be made?
Looking for a fun and easy DIY project? Try making your own tissue paper bookmarks! Start by cutting strips of cardstock that are two inches wide. Next, punch a hole at the top of each strip. Then, brush the back of your tissue paper with Mod Podge and carefully lay them down on the cardstock, smoothing out any bubbles. Finally, add a piece of ribbon through the hole and you’ll have a beautiful, customized bookmark to use in your favorite books.
If you’re a book lover looking for a creative way to mark your place, why not make your own tissue paper bookmarks? Begin by cutting cardstock into strips that are two inches wide and punching a hole at the top of each one. Then, brush the back of your tissue paper with Mod Podge and carefully lay them down on the cardstock, smoothing out any bubbles. Finally, add a piece of ribbon through the hole and voila! You’ll have a unique and personalized bookmark to show off to your fellow book enthusiasts.
Looking to add a personal touch to your reading experience? Try making your own tissue paper bookmarks! Start by cutting strips of cardstock that are two inches wide and punching a hole at the top of each one. Then, brush the back of your tissue paper with Mod Podge and carefully lay them down on the cardstock, smoothing out any bubbles. Finish by adding a piece of ribbon through the hole and you’ll have a lovely, customized bookmark to use in all of your favorite books.
What is the best paper for bookmarks?
When it comes to choosing the best paper for bookmarks, durability and thickness are key factors to consider. Opt for a heavy cardstock or cover paper that can withstand frequent handling and won’t easily tear or bend. Look for paper with a smooth finish that is easy to write on and won’t smudge.
Another important consideration when selecting paper for bookmarks is its ability to hold ink and colors well. Choose a paper that is compatible with your chosen printing method, whether it be inkjet or laser printing. A paper with a bright white color will make your bookmarks stand out and showcase your designs beautifully.
In conclusion, the best paper for bookmarks is a durable, thick cardstock with a smooth finish that holds ink and colors well. By choosing the right paper, you can create bookmarks that are not only eye-catching but also long-lasting. So next time you’re making bookmarks, remember to select a high-quality paper that will enhance the overall look and feel of your design.
Master the Art of Paper Bookmark Making
Are you tired of losing your place in your favorite book? Look no further, as we have the perfect solution for you – paper bookmarks! Master the art of paper bookmark making with our simple and easy-to-follow guide. With just a few materials and a little bit of creativity, you can create beautiful and personalized bookmarks that will keep your place secure and add a touch of charm to your reading experience.
Paper bookmark making is a fun and relaxing activity that anyone can enjoy. Whether you’re a seasoned crafter or a beginner looking to try something new, making paper bookmarks is a great way to unleash your creativity and create something unique. With endless possibilities for colors, patterns, and designs, you can let your imagination run wild and make bookmarks that reflect your personal style and interests.
So why settle for boring store-bought bookmarks when you can create your own masterpiece? Take your bookmark game to the next level and master the art of paper bookmark making today. With just a few simple steps, you can create one-of-a-kind bookmarks that are not only functional but also a joy to look at. Say goodbye to dog-eared pages and hello to beautifully crafted bookmarks that will make your reading experience even more enjoyable.
Simple Steps to Create Your Own Paper Bookmark
Are you tired of losing your page in your favorite book? Look no further! With just a few simple steps, you can create your own personalized paper bookmark. All you need is some colorful paper, scissors, and a little bit of creativity. Cut the paper into a long rectangular shape, decorate it with drawings or stickers if you’d like, and voila! You now have a unique bookmark that will help you keep track of where you left off in your reading adventures.
Creating your own paper bookmark is not only practical, but also a fun and easy DIY project. By following these simple steps, you can customize your bookmark to reflect your personality and style. Whether you prefer a minimalist design or a more elaborate one, the possibilities are endless. Say goodbye to dog-eared pages and hello to your new favorite bookmark that will make reading even more enjoyable.
Crafting a Beautiful Paper Bookmark Has Never Been Easier
Are you tired of losing your place in your favorite book? Look no further! Crafting a beautiful paper bookmark has never been easier. With just a few simple materials and a little bit of creativity, you can create a stunning and unique bookmark that will make reading even more enjoyable. Whether you’re a seasoned crafter or just looking for a fun and easy DIY project, making your own paper bookmark is the perfect way to add a personal touch to your reading experience. Say goodbye to dog-eared pages and hello to a beautiful, handmade bookmark that will keep your place in style.
Gone are the days of using old receipts or random bits of paper as bookmarks. Now, with the help of some basic crafting supplies, you can easily create a beautiful paper bookmark that will make a statement. Whether you prefer a simple and elegant design or something more colorful and playful, the options are endless when it comes to crafting your own bookmark. So why settle for a boring store-bought bookmark when you can create something truly unique and special? Get ready to impress your friends with your crafting skills and never lose your place in a book again!
Easy DIY Paper Bookmark Tutorial
Looking to add a personal touch to your reading experience? Why not try making your own paper bookmark with this easy DIY tutorial! With just a few simple materials and steps, you can create a unique and functional bookmark that will make your reading sessions even more enjoyable.
To start, gather your materials: colorful paper or cardstock, scissors, a ruler, and decorative stickers or markers. Cut your paper into a rectangular shape, ensuring it is long enough to comfortably mark your pages. Then, fold the paper in half to create a crease and decorate the front with your chosen designs. You can get creative and add your favorite quotes, drawings, or even personalize it with your name.
Once your bookmark is decorated to your liking, it’s time to make it durable and long-lasting. You can laminate it for extra protection or cover it in clear adhesive paper. This will not only make your bookmark more sturdy but also add a glossy finish that will make it stand out in your books. With your new DIY paper bookmark in hand, you’ll never lose your place again and will have a stylish accessory to accompany you on your reading adventures.
In just a few simple steps, you can create your own personalized paper bookmarks to add a touch of creativity and functionality to your reading experience. With a few materials and a little bit of time, you can design unique bookmarks that reflect your personality and style. So why settle for a plain, ordinary bookmark when you can easily make one that stands out and adds a personal touch to your favorite books? Get creative and start making your own paper bookmarks today!