


Looking for a fun and easy craft project? Look no further than paper mache masks! With just a few simple materials and techniques, you can create stunning and unique masks to wear or display. In this article, we’ll explore some easy paper mache mask techniques that anyone can master, whether you’re a beginner or a seasoned crafter. Get ready to unleash your creativity and make some truly impressive works of art!
How many layers of paper mache were needed to make your mask?
Creating a mask with paper mache requires careful layering to achieve the desired strength and durability. For most projects, three overlapping layers are typically enough to provide a sturdy foundation. This allows for a balance between thickness and flexibility in the final product.
To ensure the success of your paper mache mask, it is important to allow for proper drying time between each layer. Plan ahead and set aside at least two days for the entire process, including drying time. This patience will result in a well-crafted mask that is both visually appealing and long-lasting.
After completing the layering process, be sure to clean any excess paste off of surfaces where it does not belong. Paper mache paste can dry incredibly hard, similar to cement, making it difficult to remove once it has set. Taking the time to tidy up during the creation process will save you time and frustration in the long run.
Should all layers of paper mache be done at once?
Yes, it is recommended to do all layers of paper mache at once to ensure a smooth and cohesive finish. By applying multiple layers in one sitting, you can avoid any inconsistencies or visible seams between layers, resulting in a more professional-looking final product. Additionally, doing all layers at once allows the paper mache to dry evenly, preventing any warping or bubbling that may occur when applying layers at different times. This method also saves time and effort, as you can complete the project more efficiently without having to wait for each layer to dry before adding the next one.
What is the simplest face mask to create?
Looking for a simple and effective face mask to make at home? Look no further than the classic oatmeal mask. Oatmeal is not only gentle on the skin but also helps to soothe and hydrate, making it perfect for all skin types. Simply mix cooked oatmeal with a bit of honey and let it cool before applying to your face for a quick and easy DIY spa treatment.
If you’re looking for a mask that is both easy to make and great for acne-prone skin, try a honey and cinnamon mask. Honey is known for its antibacterial properties, while cinnamon can help to reduce inflammation and redness. Mix the two ingredients together to form a paste, apply to your face, and leave on for 10-15 minutes before rinsing off for clear and glowing skin.
For a quick and refreshing face mask that is perfect for brightening dull skin, try a yogurt and lemon mask. Yogurt helps to exfoliate and hydrate the skin, while lemon is known for its brightening properties. Mix the two ingredients together and apply to your face for a rejuvenating and revitalizing treatment that will leave your skin looking radiant.
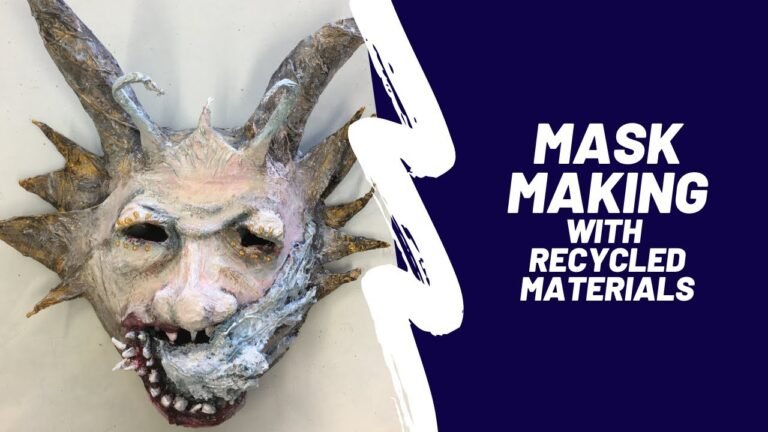
Master the Art of Paper Mache Masks with Ease
Are you ready to unleash your creativity and learn the art of paper mache mask making? Look no further! With our easy-to-follow instructions and tips, you’ll be able to master the art of paper mache masks in no time. Whether you’re a beginner or an experienced crafter, our step-by-step guide will help you create stunning and unique masks that are sure to impress. From choosing the right materials to adding intricate details, we’ve got you covered. So, grab your supplies and get ready to bring your imagination to life with the art of paper mache mask making!
With our comprehensive guide, you’ll learn all the techniques and tricks to make paper mache mask making a breeze. Say goodbye to complicated instructions and hello to a fun and enjoyable crafting experience. Whether you want to make a simple mask for a party or an elaborate one for a special event, our guide will help you achieve professional-looking results with ease. So, why wait? Dive into the world of paper mache mask making and let your creativity soar!
Simple Steps for Stunning Paper Mache Mask Creations
Unleash your creativity with these simple steps for creating stunning paper mache masks. Begin by gathering your materials – newspaper strips, flour, water, and a balloon or mask form. Mix the flour and water to create a paste, then dip the newspaper strips into the paste and layer them onto the balloon or mask form. Allow the layers to dry completely before adding additional layers for strength and durability.
Once your paper mache mask has dried completely, it’s time to unleash your artistic flair. Use paint, markers, or other embellishments to bring your mask to life. Experiment with different colors, patterns, and textures to create a truly unique and eye-catching design. Don’t be afraid to let your imagination run wild – the possibilities are endless when it comes to paper mache mask creations.
Whether you’re crafting a mask for a costume party, theatrical production, or simply for fun, these simple steps will guide you towards creating a stunning paper mache masterpiece. Let your creativity shine through as you mold, shape, and decorate your mask with precision and passion. With just a few basic materials and a touch of imagination, you can create a one-of-a-kind paper mache mask that is sure to impress.
Incorporating these easy paper mache mask techniques into your next project will undoubtedly enhance your crafting experience. From using simple materials to mastering the art of layering, these methods will help you create unique and visually stunning masks. Whether you are a beginner or a seasoned crafter, experimenting with these techniques will surely yield impressive results. Let your creativity flow and have fun exploring the endless possibilities of paper mache!