


Looking to add a touch of elegance and charm to your home decor? Look no further than paper lanterns! These beautiful and versatile decorations are a perfect addition to any space, and the best part is, they’re incredibly easy to make. In this step-by-step guide, we’ll show you how to create your own stunning paper lanterns, perfect for adding a warm and inviting glow to any room. Whether you’re a crafting novice or a seasoned DIY pro, you’ll love the simplicity and beauty of these handmade lanterns. So, grab your supplies and let’s get started on this fun and creative project!
How do I make paper lanterns step by step?
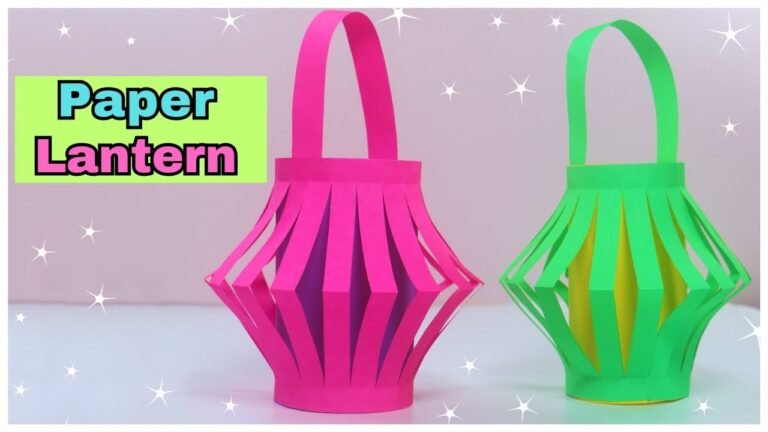
To make paper lanterns step by step, start by choosing a piece of colorful paper and cutting it into a perfect square. Fold the square in half diagonally to create a triangle, then fold it in half again to make a smaller triangle. With the folded edge facing you, use scissors to cut small, even slits along the folded edge, being careful not to cut all the way through. Unfold the paper and bring the short edges together to form a cylinder, securing it with glue or tape. Finally, add a handle on top and a tea light inside to illuminate your handmade paper lantern. This simple and fun DIY project is a great way to add a touch of whimsy and charm to any space.
What materials do I need to make paper lanterns?
To make paper lanterns, you will need a few basic materials. First, you will need some sturdy paper, such as cardstock or construction paper, to create the body of the lantern. Additionally, you will need a pair of scissors to cut the paper into the desired shape and size, as well as a ruler to ensure precision. To add decorative elements to the lantern, you can use markers, paint, or stickers. Finally, you will need a source of light, such as a battery-operated tea light or string lights, to illuminate the finished lantern. With these materials in hand, you can create beautiful paper lanterns to add a warm and cozy ambiance to any space.
Can you provide a simple tutorial for making paper lanterns?
Sure! Making paper lanterns is a fun and easy DIY project that anyone can enjoy. To start, gather your materials: colored paper, scissors, glue, and a ruler. First, measure and cut the paper into a rectangular shape. Then, fold the paper in half lengthwise and make several evenly spaced cuts along the folded edge, making sure to leave a border at the top. Next, unfold the paper and roll it into a cylinder, securing the edges with glue. Finally, attach a handle to the top of the lantern and add a tea light or LED candle to illuminate it. Voila! You have your very own handmade paper lantern ready to light up any room or outdoor space.
Creating paper lanterns is a fantastic way to add a touch of whimsy and creativity to any occasion. Whether you’re decorating for a party, wedding, or simply sprucing up your home, these DIY lanterns are a charming and customizable option. Experiment with different colored papers, patterns, and sizes to create a unique and personalized look. You can also get crafty with embellishments like ribbons, beads, or glitter to make your lanterns even more special. With just a few simple steps, you can brighten up any space with these delightful paper lanterns.
Illuminating Your Creativity: Paper Lantern Making
Unleash your creativity and let your imagination soar with our paper lantern making workshop. Craft beautiful and unique lanterns that will illuminate any space and bring a warm glow to your home or event. With step-by-step guidance and a variety of materials to choose from, you’ll be able to create a one-of-a-kind masterpiece that reflects your personal style and vision.
Join us for an illuminating experience that will ignite your creativity and brighten up any room. Whether you’re a seasoned crafter or new to the world of DIY projects, our paper lantern making workshop is the perfect opportunity to explore your artistic side and create something truly special. Let your light shine through your handmade lantern and add a touch of magic to any occasion.
Craft Your Own Glowing Masterpiece: Paper Lantern DIY
Illuminate your space with a personal touch by creating your own paper lantern masterpiece. This DIY project is perfect for adding a warm and inviting ambiance to any room or outdoor setting. With just a few simple materials and a little creativity, you can craft a glowing work of art that will brighten up any occasion.
To get started on your paper lantern DIY, gather your materials, including paper, scissors, glue, and a LED light or candle. Choose a color scheme or theme that fits your personal style or the atmosphere you want to create. Whether you prefer a minimalist design or intricate patterns, the possibilities are endless when it comes to customizing your paper lantern.
Once you have your materials and design ideas in mind, follow the step-by-step instructions to assemble your paper lantern. From folding and cutting the paper to securing it in place, the process is both fun and rewarding. With your finished creation in hand, you can proudly display your glowing masterpiece in your home or outdoor space, adding a touch of warmth and charm to any setting.
Light Up Your Space: Easy Paper Lantern Tutorial
Illuminate your space with our easy paper lantern tutorial, perfect for adding a touch of warmth and charm to any room. With just a few simple materials and steps, you can create a beautiful paper lantern that will instantly brighten up your home. Whether you hang it in a cozy corner or use it as a centerpiece for a special occasion, this DIY project is sure to bring a soft, inviting glow to your space. So why wait? Light up your space today with this fun and creative paper lantern tutorial.
Step-by-Step: Making Beautiful Paper Lanterns
Transform a simple piece of paper into a stunning paper lantern with our step-by-step guide. Begin by folding the paper in half and then cutting slits along the folded edge. Next, unfold the paper and carefully roll it into a cylinder shape, securing the edges with glue or tape. Add a handle at the top and a tea light inside to illuminate your creation.
Once you have mastered the basic paper lantern design, get creative with different colors, patterns, and sizes. Experiment with using tissue paper, vellum, or even decorative origami paper to achieve unique and beautiful lanterns. Consider embellishing your lanterns with ribbons, beads, or sequins for an extra touch of elegance.
Whether you are looking to add a touch of ambiance to a special event or simply want to brighten up a room, making paper lanterns is a fun and rewarding craft. With just a few simple materials and our easy-to-follow instructions, you can create your own beautiful paper lanterns to enjoy and share with others.
Crafting paper lanterns is a fun and creative way to add some charm to any space. By following these simple steps, you can create your own personalized lanterns to brighten up your home or special event. So gather your materials, unleash your creativity, and let your imagination soar as you embark on this delightful DIY project. Let your paper lanterns shine bright and bring a touch of whimsy to any occasion.