Are you looking to create your own stunning paper maché mask but unsure where to start? Look no further! In this article, we’ll provide you with expert tips on shaping your mask to perfection. From choosing the right materials to mastering the art of sculpting, we have you covered. Whether you’re a seasoned crafter or a novice DIY enthusiast, these tips will help you create a masterpiece that is sure to impress. Let’s get started!
How many layers are recommended for a paper mache mask?
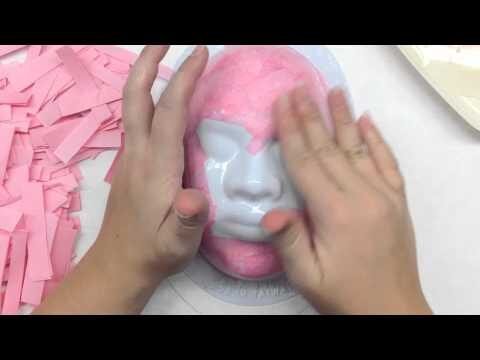
When creating a paper mache mask, it’s important to consider the number of layers you apply. Too many layers can prevent the mask from drying properly, so it’s best to stick to three overlapping layers. This will ensure that the mask is sturdy and can hold its shape without taking an excessively long time to dry.
In order to achieve the right balance of sturdiness and drying time, it is recommended to apply three overlapping layers of paper and goo when making a paper mache mask. This will allow the mask to hold its shape while still being able to dry effectively. Avoid the temptation to add more layers, as this can lead to prolonged drying times and potential issues with the mask’s structural integrity.
What are the techniques for paper mache?
If you’re looking to create paper mache, there are two main techniques you can use. The first method involves cutting or tearing paper into strips and then gluing them together to form the desired shape. Alternatively, you can also create paper mache using paper pulp, which is made by soaking or boiling paper and then adding glue to create a moldable material.
Whichever method you choose, both techniques for paper mache require the use of a strong adhesive to hold the paper together. The first method uses glue to bind the paper strips, while the second method involves adding glue to the paper pulp to create a moldable material. By mastering these techniques, you can create a wide variety of paper mache projects, from simple masks and sculptures to intricate decorative items.
Can you provide instructions on how to smooth out a paper mache mask?
To smooth out a paper mache mask, start by sanding the surface with fine-grit sandpaper to remove any rough or uneven areas. Then, apply a thin layer of paper mache paste over the mask and smooth it out with your fingers or a paintbrush. Once the paste is dry, sand it again to achieve a smooth and even finish. Repeat this process as needed until the mask is completely smooth and ready for painting or decorating.
Achieving a smooth finish on a paper mache mask is essential for creating a professional-looking final product. By sanding and applying multiple thin layers of paper mache paste, you can gradually build up a smooth and even surface. This method allows for greater control and precision, resulting in a mask that is beautifully smooth and ready for any creative embellishments.
Crafting flawless paper mache masks
Are you looking to create stunning paper mache masks that will dazzle at your next masquerade party? Look no further! Crafting flawless paper mache masks is easier than you think. With just a few simple materials and a bit of creativity, you can make unique and eye-catching masks that will be the talk of the town. Whether you’re a seasoned crafter or a beginner, our step-by-step guide will walk you through the process, ensuring that your masks turn out flawless every time. From forming the base to adding intricate details, our tips and tricks will help you master the art of paper mache mask making in no time. So, get ready to unleash your creativity and craft the perfect mask for any occasion!
Creating flawless paper mache masks is a fun and rewarding activity that anyone can enjoy. With our easy-to-follow instructions and expert advice, you’ll be able to produce professional-looking masks that are sure to impress. Whether you’re making masks for a party, a costume, or just for fun, the possibilities are endless. From elegant, Venetian-inspired designs to whimsical and playful creations, you’ll have the skills and confidence to bring your vision to life. So, gather your supplies and get ready to dive into the world of paper mache mask making. With our guidance, you’ll be able to craft masks that are truly one-of-a-kind and flawless in every way.
Mastering the art of paper mache mask making
Are you ready to elevate your paper mache mask making skills to the next level? With our expert guidance and innovative techniques, you’ll be mastering the art of creating stunning and unique paper mache masks in no time. Whether you’re a beginner or have some experience in this craft, our step-by-step instructions and tips will help you unlock your creativity and achieve professional-looking results. Get ready to impress your friends and family with your newfound mastery of paper mache mask making.
Transform ordinary materials into extraordinary works of art with our comprehensive guide to mastering the art of paper mache mask making. From designing and shaping the base to adding intricate details and finishing touches, you’ll learn all the essential skills and tricks of the trade. With our easy-to-follow instructions and inspirational ideas, you’ll be able to unleash your imagination and create one-of-a-kind masks that reflect your personality and style. Whether you’re crafting masks for a special event, costume party, or personal collection, our expert tips will help you take your paper mache mask making to the next level.
Transforming paper mache into stunning masks
Transforming paper mache into stunning masks is an art form that requires creativity and precision. With the right techniques and materials, paper mache can be molded and shaped into intricate and beautiful designs, making it the perfect medium for creating unique and eye-catching masks. Whether you’re a seasoned artist or a beginner looking to explore a new craft, the process of transforming paper mache into stunning masks is both fulfilling and rewarding, allowing you to unleash your imagination and create one-of-a-kind pieces that are sure to impress.
From traditional masquerade masks to modern and abstract designs, the possibilities for transforming paper mache into stunning masks are endless. By experimenting with different textures, colors, and embellishments, you can create masks that are truly works of art, each with its own distinctive flair and personality. Whether you’re crafting masks for a special event or simply as a creative hobby, the process of transforming paper mache into stunning masks offers a unique and enjoyable way to express yourself and showcase your artistic talents.
Incorporating these paper maché mask shaping tips will help you create stunning and unique designs that are sure to impress. By utilizing proper techniques such as adding layers strategically and allowing for ample drying time, you can achieve the desired shape and form for your mask. Remember to experiment with different materials and textures to add depth and dimension to your creations. With practice and patience, you can master the art of paper maché mask shaping and unleash your creativity in a whole new way.


